Posts tonen met het label jewellery. Alle posts tonen

vrijdag 8 juni 2012

"another stolen relic "

Yes the title refers to the amazing scene in which Loki confronts Odin.
ahum... yes... Well this blog isn't really about that scene.
IT IS, however, about Loki's oh so awesome helmet.
Which balances between rediculously looking and friggin awesome.

So, Now that my goldsmith classes are over, I have an entire day off.
So, I go shopping ?
Oh hell no!
I go to the atelier and make stuff for myself! hoeza!


So, I think you can guess what I started on.
Yes, a cute little Loki helmet!
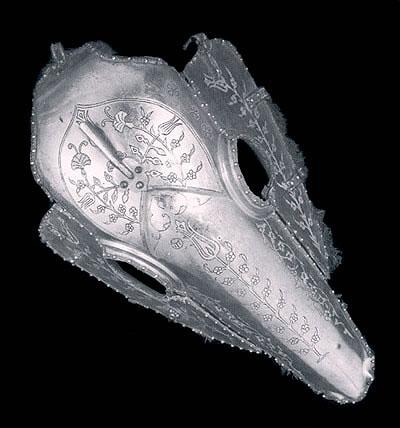
I 'studied ' on the designs of that helmet for a while, to understand just how it was made.
And I must say it's CRAZY! however, I managed to make a little design that's simple enough to make it in the size of a pendant.
Also, I discovered that the helmet Loki wears in Thor is actually very different from the helmet in The Avengers. I never really payed much attention to it until now.
Loki's helmet in Thor is more ' knight ' looking, it's less detailed than Loki's helmet in The Avengers.
Which ofcourse, perfectly makes sense. Loki in Thor is seen standing between all the other soldiers in Asgard, and they all wear the exact same outfit as Loki ( plus helmet )
In The Avengers of course, he's dressed more like a God-king. So, ofcourse the helmet is a lot more detailed.

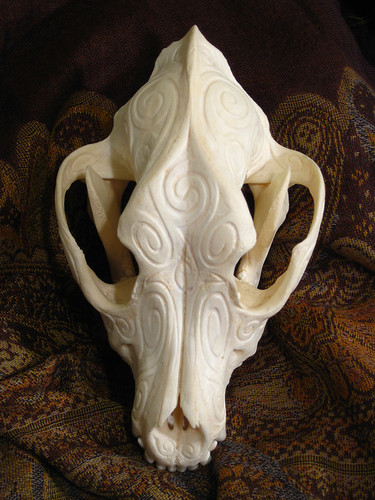
ANYWAY. So ofcourse, To make it possible to make, I focussed on the helmet he wears in Thor.
Yet, even that one is still a bit too difficult to make in such a small size.
However, I'll do my very best to make it look as much alike as possible.
It won't be a problem to make it recognisable though. with the horns and all.... 

So, first thing I had to ask myself was : How to start on this ! How do I make this helmet without making it too difficult for myself!
The trick is too see the helmet in rough lines. The helmet itself is actually, a square. And the base is nothing more but a simple ring! So hooray! I had my starting point, and now up to the rest!
This, is what I came up with :


I managed to see it in 9 steps. So, I've started on making this piece as well.
I'm aware I will run into some trouble along the way, for this is the first time I'm making something like this, and I'm pretty sure there are easier/better ways to get this done.
Luckely my boss is right beside me when working on this.
The part I'm most worried about is the one in which I actually make seperate pieces, that are on itself, made out of more than one part .
And then, I have to putt all those pieces together, and solder it.
however those seperate peices had some soldering done as well... So... it will get diccult to solder it nicely without ruining my previous soldering.
Plus the edges have to stay sharp! So I'll have to ' blind ' solder. It's a technique in which you place the solder underneath a piece, and so when you heat it you have to ' feel ' when the solder has melted.

Anyway, Like I've said, I have my boss right beside me to help me out when things get rough.
here are some teasers from the making off :

From ring.....


To a rough helmet shape


The base of the helmet is 20 mm on 20 mm. So it's not too tiny... ( if I made it any smaller it was going to get too difficult to make it as detailed as possible )

Can't wait to get back to it....

maandag 21 mei 2012

Wax bird skulls

So, I was asked to make a birdskull necklace in silver for a dear friend.
She had given me a very cheap ring with a little birdskull.
She told me I could use it to make some jewellery for myself as well, Hoozah!

The metal was awfull.... My saw went through it like it was butter.
And because I was curious I heated some parts.... and what happened I simply can't explain. I'm pretty sure it was just a mess of garbage melted together. It was awfull....
However, I had to clean it up completely before I could make a mold of it.
I opened the eyes, made the lines in the skull more clear and made the inside hollow.

When done, I made a mold, poored wax into it , and this is what came out!


I'll get one cast tomorrow, polish it nicely and make a pendant out of it.
I hope she'll like it. otherwise she's always free to tell me and I'll change it.

The others I'll keep to myself and experiment with a little bit more.
I can carve into it, add more elements, change their shape some more... It'll be fun! And I have such wild plans for these other pieces.
Also, I have the mold! So I can cast as much as I want!
I really can't wait to get started on these.


oh, and I'ts decided....I'm going for the Loki figure after all!
Because...well...

dinsdag 15 mei 2012

Metal Engraving


So, In september I'll start with a new course at evening school. Metal engraving.
This year I've done 2 modules of Waxcasting and molding.
One year is ofcourse not enough to really get good in it.
But knowing the basics will already help me on my way a lot.
plus, it will open my world a bit more, knowing what's possible and what not.
Even if I won't be able to do it myself in the end anyway, knowing it's out there and how it works will have affect on my designs and make them more varied.

Also, if I really like it I can just take extra classes and do some home schooling.


I'll have to buy a lot of material though, but it's worth it! Engraving really is something that will bring so much more to my work.
I think it would suit my ' style ' as well, and it will allow me to create this athmosphere I so desperatly want to express in my work.
Details, subtile markings, soft and elegant lines.... Those things I really want to put in my future jewellery .
Engraving is so underrated as well. It's a lost art, which is sad in a way because it's just so beautifull.


plus I think you can do so much more with it than just ' classic ' engraving work.
and also, who sais I have to limit myself to metal ?
There's wood, bone aso I can also engrave.
because if you can do it in metal, you can do it in anything really... I do know I'll cut myself a lot.
The tools are ridiculously sharp and accidents happens really fast.

who knows, the bones in my hand might get 'engraved ' as well :') by accident that is.

Could be pretty, no ?


messing butterfly finally done!


all that is left is polish it nicely...
Polishing is an art on itself, so I don't expect it to be perfect ( far from actually )
Isn't it just.....ugly ? I hate it so much to be honest. But oh well...it was an exercise, and a good one... I cursed out loud when soldering the top two wings.
Never again!

Also, today I had my exam about goldsmithing.
It went better than I thought It would go. I'm sure I'll pass.

well..maybe my exam would have been better if I hadn't gone and watch the avengers yesterday for the second time :')
" Jazz wanna join ? we're going to see the avengers! "
" but...I....I have exam tomorrow...and I've already seen it..."
" oh alright some other ti- "
" NO I'M JOINING CAUSE LOKI AND ULTIMATE NERDGAZMS "

That's kinda how the conversation went.


and then me in the cinema :
" OH SHI OH SHIIIIT it's startiiiiiiing D8 oh no NO NO HAWKEYE NOOO  . LOOK LOOK IT'S FRIGGIN IRON MAN I CAN'T EVEN GAAAAWD . Oh it's the Hulk he's here! I can't even it's really him OH MY THOR IS HERE. OH MY ALL THE HERO'S ARE HEEEEEEEEERE "

friends :


me :


Yeah I'm pretty sure they won't be joining me when they start playing The Avengers II

I'm gonna buy the DVD, watch it non stop... unf all the nerdgasms

oh and this is so sad it's actually funny :


vrijdag 4 mei 2012

stones and settings

A thing I really love doing, yet is a stressy job, is removing gemstones from jewellery to be re-used.
It's stressy because you sometimes do rough work to get them free, and so you can easily damage the stones.
One splintered to pieces when I just bended the ring itself a little, luckely it was a very cheap stone and hardly re-usable, because it was so dirty and scratched on the surface.
The diamonds of course can handle a lot more, yet even they can break because of pressure.

These, are all the stones I had recuperated from the antique jewellery.

But, my day was filled with even more gemstones, for then my boss gave me the assignment to make settings for these lovelies.
I myself am not a fan of the colour red in general, but I just love Garnet.
The glow Garnet gives, tends to lean toward a warm shade of brownish-orange . That in combination with the deep blood red gives the stone such a lively and warm effect.


Yet, making settings is one of the jobs I dislike the most.
Not only does it take forever, you have to be super careful and concentrated when working.
No talking or joking when making settings!
( I guess things will go a lot smoother though once I'm more experienced. Remember everyone I'm still a beginner! )


What makes everything more difficult is the fact I was working with silver.
When aiming your flame on just one part of the piece, the entire piece heats up rapidly.
Do, when you need pinpoint precission when soldering, things do get a little exciting.
You ahve to solder one piece of wire at a time, yet when working on the second, third or last one, you need to be super carefull not to heat the piece too much, or everything falls apart again.
also because the piece is so small, the heating goes even faster.
Plus, once that's done, you need to solder another oval underneath the piece, just a hair away from where you just soldered the wires.


only managed to get 5 pieces by the end of the day.
But, do note that preparing the wires and making the ovals takes a lot of time as well.
plus you ahve to measure everything perfectly, for the stones must fit in perfectly as well.
Luckely, the size of the garnet stones were all the same, so I only needed to measure one to get started.
(it sucks when each stone has a different size... )

However, At the start of the year I also had to make something similar, and I wasn't able to get this far. plus my pieces were burned and un usable.
Back then I had to retry a lot, because everything fell apart when I was getting close to the end.
Now, I only had to re adjust some wires that had fallen to the side a little, but that's about it!

So, today I proved to myself and my boss that I've improved a lot.
My boss as well told me I'm doing wonderful, and that he has high hopes for me.
hooray!

dinsdag 1 mei 2012

in progress

A drawing I'm working on.
This is a character out of my ' sacrifice ' story I'm starting with.
She's from the Chandelier clan.
( I will explain about these different families and clans one day...promise )
But, the character itself is actually based on a irl friend, Milinda.
my personification links her with a waterfall, so, that explains the background.
(friggin hate drawing them though! Never going to draw waterfalls again )

I'm not looking forward to colour this, because I have no idea where to start and even which colours to use. Her hair will be black with teal though, but I have no idea what clothing I'll give her either...

so, I'll just finish this drawing first without adding any colours. I'll then leave it asside, draw some other character and then once I have a collection of 'sacrifice ' characters, I can start on the colouring, focussing on their role, clan and personality.


The drawing is still very sketchy, so that's why it's so messy. But, it also gives you and idea of how I draw. It's complete chaos at first.
and have I mentioned my scanner sucks ?

zaterdag 28 april 2012

update solid bracelet

So, all that's left now is more filing, and polishing.
Yet, silver tends to scratch easily, so, if I'd just polish the surface it'd be kinda a waste of time.
So, I'm going to leave it like this, and maybe practise engraving on it.
I'd look like crap at first ( engraving is very, very difficult )
But, I'll have to start with it one day!
especially beause I really want to get good at it, engraving is absolutely gorgeous when well done.


And next to that,  some pictures of my workspot in the atelier.
As you can see I have everything I need, and more. I'm really lucky to be using so many material.
And we even have super comfty chairs....


dinsdag 24 april 2012

Silver Clock pendant


So, this is something I'm making for my dear friend, Milinda.
She's crazy about these kinds of clocks, so, I've been working outside my hours in the atelier to work on this present for her.


I still have a lot of work to do. Most parts are already made, but now I've got to finish the chains and then clean, file and sandpaper the seperate pieces.
The copper piece you see will be enameled, to give a colour accent to the piece.
Afterward it will be connected to the top layer with screws, a system often used in watches.
After that, I'll assemble all the pieces, polish everything nicely, and add the onix beads.

I hope I'll get to finish this soon, I can't wait to give it to her!

Messing Butterfly exercise

To be honest, I really REALLY hate this assignment.
It takes way too long and not to mention it's pretty boring as well. ( and, it's far from pretty )
This was a metal wire bending exercise. The wings had to be exactely the same. So folding the first wing wasn't too hard...but to make the second one perfectly the same was rather annoying.
Also, every wire within the wings had to have a different diameter, so the preperations alone already took a lot of time.
It's almost done now though ( thank god)

Now, I only need to solder the wings onto the back of the body, add the eyes and polish everything up.
*sigh* I'm so glad I'm almost done with this.
Yeah, that's the annoying thing about technical exercises, they're far from pretty.
( well in this case they are )
I'll ask my teacher of this class if I'm allowed to 'pimp ' it a little once he evaluated me on this exercise. I might be able to make something out of it....

Normally. I would have visited my previous school, the Royal academy of fine arts, when class was over.
but, I've been feeling ill all day and can hardly speak.
My voice seems to have vanished....
So, I figured it'd be best to go see my old classmates some other time, because I'm sure there will be a lot of talking and asking....So, one needs a voice to do that.


vrijdag 20 april 2012

The solid bracelet

So, the exercise I'm working on right now is a solid bracelet. With an hinge system and a clip-lock.( eeerr... or whatever it is called in English )
First I had to make a lock with an extra safety system, to understand the mechanic.


It was actually a lot more simple than what I imagined it would be.
however, the one I made is rather big. I'm sure that if I have to make the same type of lock smaller, it will be a lot more difficult.

Once that was done, I could start on the bracelet.
I made two plates, made them round, and the smallest one ( the one that will be on the inside ) I decorated with a fantasy pattern. when done I cleaned it all up nicely.

After that I soldered the two plates on a third plate. This was quite the challenge.... since it's silver I had to heat the entire piece just to solder the sides of the bracelet.
So, it took a lot of patience to get it done.


so, after cleaning it again, I did the other side and then... yes I cleaned it again.
Then I had the file the entire piece as well, because of the constant heating when soldering, the surface of the silver was completely stained and that can only be removed with rough work.

but yeah, once done with all that, it looked like this :


So, monday I'll have to saw the entire piece in two, make the hinge and the lock.
The lock will be placed withing the hollow part of the bracelet.
So, the lock itself won't be visible.

*sigh* it was quite the work, but I like where it's getting.